Wednesday, July 16, 2014

Who left the garage open?

My kids love my keys and all the gadgets attached to them... including the remote garage door opener attached to them. This leads to the garage doors always being in a mysterious "Schrödinger's cat" like state of either open or closed.. but which one is it?
Well.. we live in what the Realtor called a "transitioning" neighborhood...  transitioning for the better or worst has yet to be determined. So leaving the garage open for any period of time is like having a free sale on tools, all you can carry!

So, it was either buy an indicator for $35 (which was the wife's choice.. ) or make one with left over stuffs from the bottomless parts box (my choice). The criteria for the project was it had to be as reliable as an off-the-shelf unit and cost $0 in parts. I thought it would take an hour... but like most everything else.. that always turns into a weekend instead.

finished unit.. (just imagine the lights blinking spasmodically)

Digging around the shop I found .. a salvaged roller snap switch, a roll of 24g solid phone wire, a 9v 300mA powersupply from an old answering machine, some perfboard,  some connectors, some scrap wood, recycle aluminum from an old sign, and a Velleman MK102 Flashing LED kit I bought on closeout at the Radio Shack for $2 years ago. One could just use a couple of regular LEDs,  but I wanted something that blinked and wouldn't be overlooked when it was on.
The Velleman kit worked out great since it has potentiometers that allow you to adjust the rate the LEDs flash.. and only consumes 17 mA of power when on. The only modification I did was to solder the LEDs to the backside of the board so they would be able to stick through the holes in the wood box I made for it. The box was made from some leftover pine that I chip-carved in a southwestern motif to match the house... and used a couple of magnets to attach it to the wall.
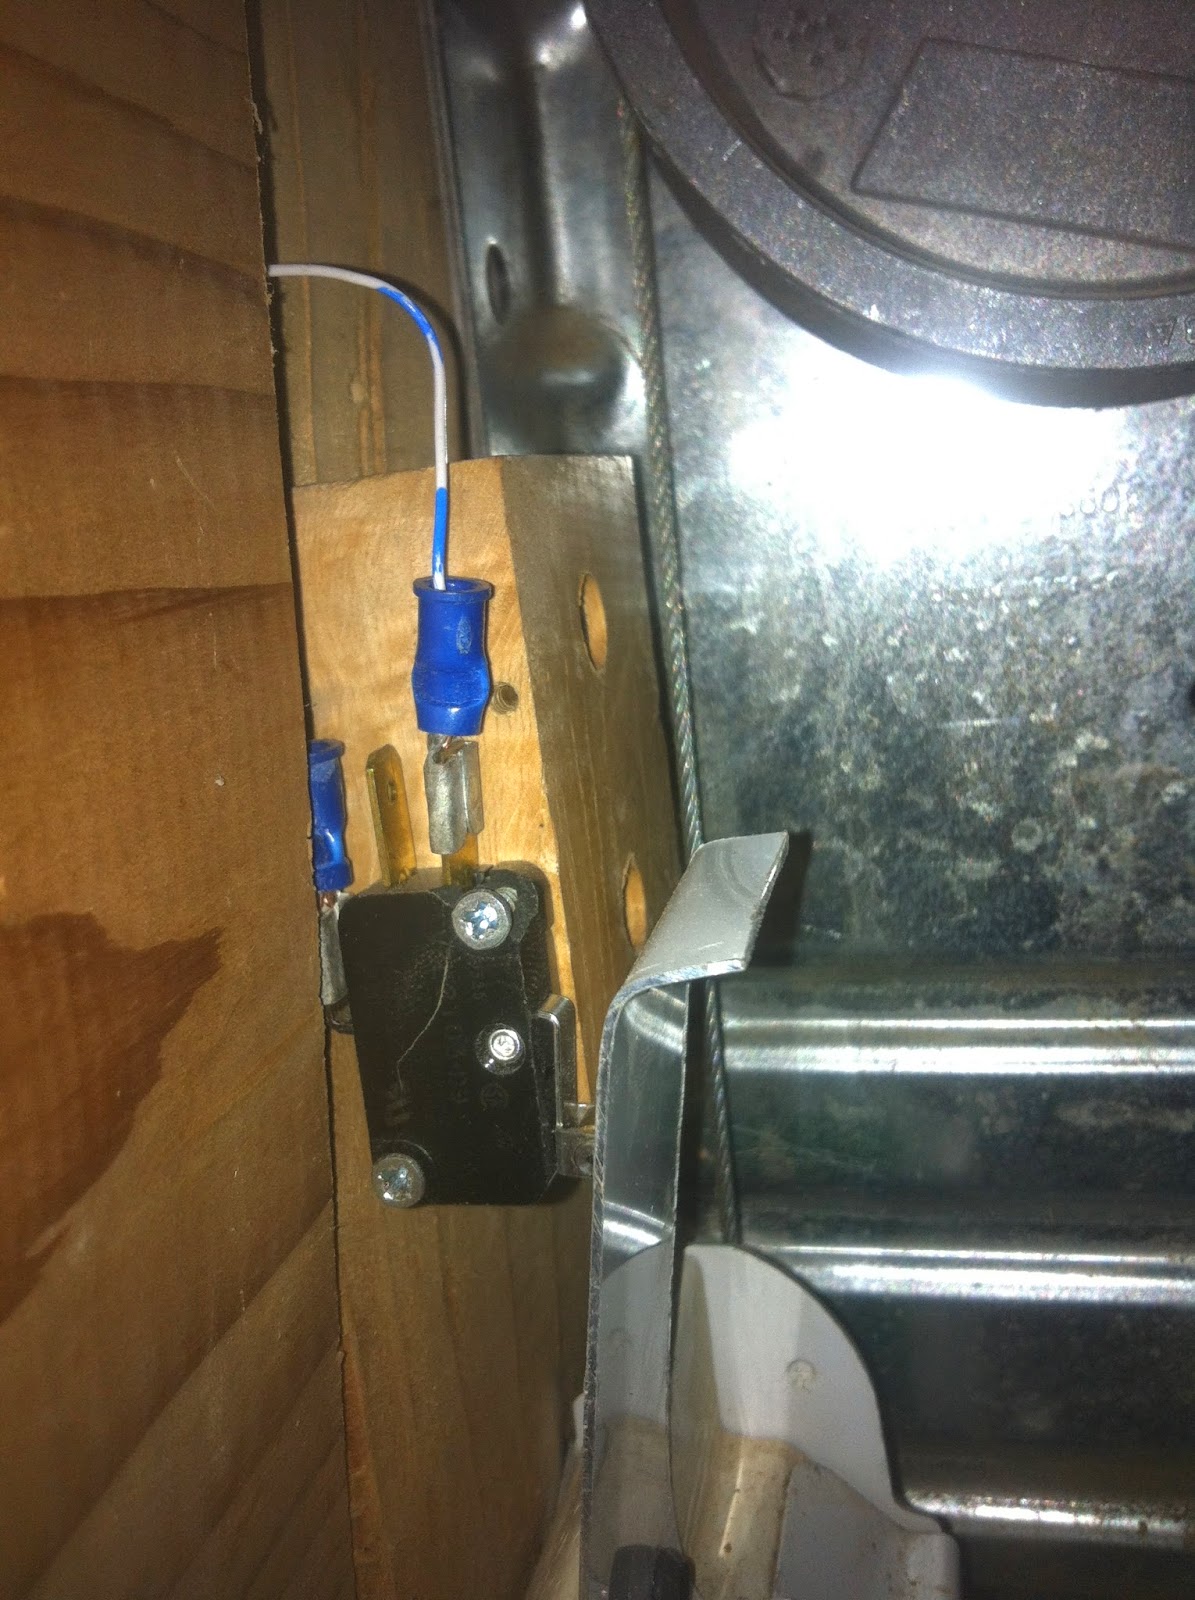
The contact switch is mounted to a wood block just above the garage door

 a scrap piece of aluminum is screwed to the garage door to make contact with switch when door is closed

Everything connects to a simple perf-board circuit located on the wall just on the other side of the LED module in the house
All in all it works quite well and was worth the extra time I spent doing the woodworking for the LED housing. A bonus is that my youngest one goes crazy when the garage door is open now, running around telling everyone about the "linking light! linking light!".
So I'll consider this a success since it now gives us an added layer of security and I didn't have to make a single trip to the hardware store to finish it.

Tuesday, July 15, 2014

Long time, No post...

First post in 4 years? Okay.. I've been busy. Chasing around both a 1 and 4 year old is full time work!
Seems it takes an organized and dedicated mind to keep up with a blog, and mine is anything but that. I applaud all those brave souls that make it work... maybe I'll find a voice that will be worth it for me to do the same.

In the meantime I'll just update as I do with somethings I've done that I find interesting.
I promise..... hehe!


Tuesday, January 5, 2010

New Year, New Project...

Having a new born a lot of work. Your time and energy gets used up quite quickly, but there are moments (albeit brief ones) where you just sit (rocking) and contemplate your entire existence both past and future. The familiar questions of who am I? what am I doing here? and what the hell was I thinking! come up, as well as, maybe its time to really figure out what path I am really on. Always a restless wanderer, I have stumbled through life following the whims of my imagination where every they may lead. I have taught myself to paint, to play music, to yearn for the higher ideals of the spirit. I have learned cooking, carpentry, silver smithing, electronics, the joys and labors of working with your hands. In all the years that have past I have come to know two things.
1. I love to learn
2. I hate that I absolutely hate working 9 to 5.
Really, I can't do it. My hours have never corresponded with that of societies, I have tried for 35 years and it just doesn't work out. I love to work on things/projects from when I have my first coffee till my eyes can no longer focus.... so punching a clock is dangerous to my sanity.
So this is my year to finally restore the balance, the solution?  I must work for myself.
Armed with 35 years of useless knowledge and creative passion I set out now to find that path.

New year, New project...... a melody of all my hobbies.

Today I finished the design of my CNC router that I intend to complete in the next 6 months.
This machine of metal, motors and mayhem is hopefully the beginning of this path.  A machine that can fabricate things... needful things... useless things... beautiful things,,,  a machine that represents the  culmination of my talents and dreams.
Dream, Design, Determination, Destiny. She will be called D4.  


Sunday, October 11, 2009

Silverwhere?


Just a quick weekend project that I've been meaning to get to for the last ... oh.. I don't know... 4 years? I collect scrap wood from demolition sites, road sides, donations... you name it, and had recently acquired a bit of Poplar that I was wondering what to do with. Ever since we moved into our home 4 years ago we have just been dumping our silverware into a drawer all helter skelter like, a mosh pit of spoons, forks, and knives. Due to the irregularly sized drawers we have, I've never be able to find a divider that fit, so I went and broke out the table saw and surface planer and got to work.

I re-sawed the "reclaimed" 3/4" poplar in half and planed them down to 1/4" planks, made a couple of dado and rabbet's, a bit of wood glue, some clamps, and finished it up with a few coats of Shellac..... voila!

It is definitely strange to finally reach for a fork and actually find one on the first try.... it's like we are real adults now.... scary!

Wednesday, October 7, 2009

Nighty Night..... finally

It's been hectic to say the least in preparing for a small child.... all those umpteen projects that seemed like you had years to finish all need to be done yesterday.

Well, here is one more off the list. Click over to see the full spread over on Lumberjocks.

Click for details: Asian Inspired Platform Bed

The headboard is still in the works..... I just need more time!!

Friday, April 3, 2009

the ultimate maker project...


Barring any violent acts of nature or karmic retribution we will have a new addition arriving in November. I dub this one the "ultimate maker project"..... since it is DIY at it's simplest and finest. It is absolutely futile for me to try and wrap your mind around the creation of this little thing... I mean, actually making a human life!?! This has all the making for a great Instructable.... one that goes on for at least 18 years. I wonder if there is plans for a DIY ultrasound machine out there...... an ultrasonic range finder, a couple of Arduinos... hmmmmm

(it all ready has picked up some of my habits.... naughty naughty)

Saturday, March 28, 2009

The trek across Texas.....


My wife and I flew out to Louisiana to help move the first load of my parents worldly possession to Albuquerque, where they plan on moving to within the year. I don't know what possessed me to say yes to this adventure since it has just about drained every ounce of energy and happiness I had left. Driving a 26' Diesel truck 1,300 miles in two days is just plain rediculous.... having to unload the 1,400 cubic foot payload into a storage unit is plain painful.
Had the weather been more forgiving it might not look so bad... but our first night back in LA it rained 8 inches in a matter of hours..... seriously? That's like the average rainfall of New Mexico for the year. Then there were the 4 thousand lightening strikes across the state and 1" hail... wild I say!
We had planned a short northerly route through Texas but that has been thwarted due to a freakin' blizzard in March! So now we slowly plod through the barren wasteland of southern Texas... halfway between Mexico and hell.... or Junction,TX....
12 hours today... another 12 hours tomorrow.... tonight I sleep and dream of flying.

Thursday, March 26, 2009

That 's "Master Jedi Geek" to you....


This was another project that was in flux for years that I finally got around to finishing.
Completely useless but oh-so high in the geekness factor.... ladies and gentlemen, I present to you the Lightsaber! Not as clumsy or as random as a blaster. An elegant weapon for a more civilized time. It has full sound effects and a LED on the side that lights up and changes color depending on the sound effects chosen.
Everyone asks why there is no illuminated blade, simple.... that is too damn cheesy!! What is the point of a plastic blade anyways? Beside the fact that it isn't real.... you digitally edit the blade in anyways! Duh!
I've wanted to build one of these for years.... but it wasn't until I found a vintage Heiland flash unit at a thrift store for 3 bucks that I was re-energized into completing it. For years I have been collecting the spindles from dead hard drives thinking that they would make great emitters for a lightsaber. The top portion of the LS is constructed from to HDD spindles and the tape head of an old VCR which have been mounted together. I was hoping to get the HDD spindles to spin up when it was turned on but they are stepper motors and would require a controller to activate and run them... too much trouble.
The guts are a hacked up "StarWars Clone Wars Ultimate LS" kit that had the ability to display either a blue, green, or red blade with different sound effects for each. I kept the orginal sound board and wired a three position switch with a tri-colored LED that allows me to select between the 3 sound banks with the LED lighting up to the corresponding color.
I kept the original flash trigger and internal switch mechanism which required some crafty modifications to run all the wires through and have it still operate. All in all it turned out pretty cool although the crash sensor still needs some more work, will probably custom build a new one that is a bit more sensitive.
I'll post a video soon of it turning on and off and the different sound effect modes to give you an idea of how rad it truely it!
May the Schwartz be with you......

Wednesday, March 25, 2009

..And the cradle will rock!


I have recently discovered that there might be a use for one of these in my life as of late. If everything continues on plan then I have roughly 7 months to start and complete this project.
I put this together in Sketchup one evening to flush out ideas and design styles. My main concern in the design was the ability to disassemble the unit for easy storage since it isn't an object that is used but for just a brief time in life.
The style is a mixture of southwestern (Spanish colonial), Arts and Craft, with a hint of Japanese, and will be built from Red Oak. The main body will be of panel construction with through mortise and tenon's that will be pegged with walnut keys through the end pieces. This will allow the piece to be broken down into 8 piece for storage or shipping.
I am holding off for another month to finish some other in progress works and to be sure that this news is definite.

Tuesday, March 24, 2009

Japanese bed, the sketchup years...


This is my original mockup/design for the bed I am constructing using Google Sketchup.
I am finally getting comfortable using the application and it is great for laying out objects in actual size, which helps with visualizing the true proportions without having to build a real prototype first. For a free program it is absolutely a great tool in a Maker's arsenal but it does have a few quirks that can be quite frustrating from time to time.
The bed can be taken apart and assembled without any tools, held together with locking joints for both stability and beauty.
I love the dichotomy between the simplicity of style and the complexity of joinery exhibited by the master carpenters, it's hard to believe that there are still temples standing made of wood, without nails or fasteners, that are over a thousand years old.

The way of the Samuari.....


Putting the final touches on a Japanese style platform bed I have been building recently.
I have always loved Japanese culture and values and became especially taken with Bushido.. or Way of the Samurai. So what better way to be reminded of the 7 virtues (Justice, Courage, Respect, Honesty, Honor, and Loyalty) then to sleep on them every night. My chip carving is a bit rusty and my Japanese calligraphy is non-existent..... but that never stopped me before!